Roll Re-Alignment for Micromill & 6x6 Brew Mill
SECTION I: Starting up the mill
The in-feed should be shut off with no material entering the rolls.
RMS suggests beginning with a roll gap of 1/8”, or approximately 2 revolution of the adjustment bolt.
You can now start up the mill. Once started, move adjustments into desired gap setting then slowly feed the machine until the max amps or capacity desired is reached.
Note: DO NOT over amp your motors or motor failure will occur. If over amp occurs, reduce the feed of material until you are back under the max amperage.
SECTION II: Zeroing the Rolls
Parallel and zero the rolls approximately once a week, or whenever the desired material cannot be obtained.
Important: The machine must be empty before adjusting rolls.
-
With the machine running, stop the flow of material going into the machine.
-
Locate the roll adjustment bolts and loosen the set screw on both the right and left adjustment pointers.
-
Use the provided allen wrench to turn the right adjustment bolt (Socket Head Cap Screw) counter-clockwise until you hear a deep rumble. This is the sound of the front roll touching the rear roll.
- Note: If you hear a high pitch sound continue to turn the screw counter-clockwise until a deep rumble is heard. The high pitch sound is likely the front roll touching a V-Block.
-
While hearing the deep rumble, move the loosened pointer to 0.
-
Once the pointer is at the zero value, use the provided allen wrench to turn the right adjustment bolt clockwise to 24 then counter clockwise to the 17.
-
Use the provided allen wrench to turn the left adjustment bolt counter-clockwise until you hear a deep rumble.
-
While hearing the deep rumble, move the loosened pointer to 0.
-
Once the pointer is at the zero value, use the provided allen wrench to turn the right adjustment bolt clockwise to 24 then counter clockwise to the 17.
-
Repeat this process on both the right and left adjustment bolts until the deep rumble is heard when the pointer is at zero without the need of hand turning the pointer. This may take multiple times depending on how out of parallel the movable roll is.
-
The movable (front) roll is now parallel to the stationary (rear) roll. Tighten the set screws on the adjustment pointers.
Section III: Paralleling the Rolls
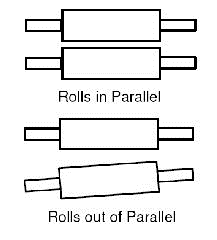
Rolls have been knocked out of alignment (out of parallel).
Follow the same procedures listed in Section II if the following events are observed:
• A foreign object is known to have been run through the mill.
• During normal re-alignment, you find that you must turn one hex bolt further than the other in order to nick the rolls, indicating that the rolls are out of parallel.